Blazor Workshop Part 1
This section will guide you through the fundamentals of Blazor with a simple project. After this we will move on to creating a more robust app.
Initial Setup
Download and install .NET Core 3.0 SDK from the following location:
https://dotnet.microsoft.com/download/dotnet-core/3.0
Download Visual Studio Community https://visualstudio.microsoft.com/vs/
Install with the following options:
- ASP.NET and web development
- Data Storage and processing
- .NET Core cross-platform development
- Go to Individual components and search for localdb. Check off the option SQL Server Express 2016 LocalDB

Your First Blazor App
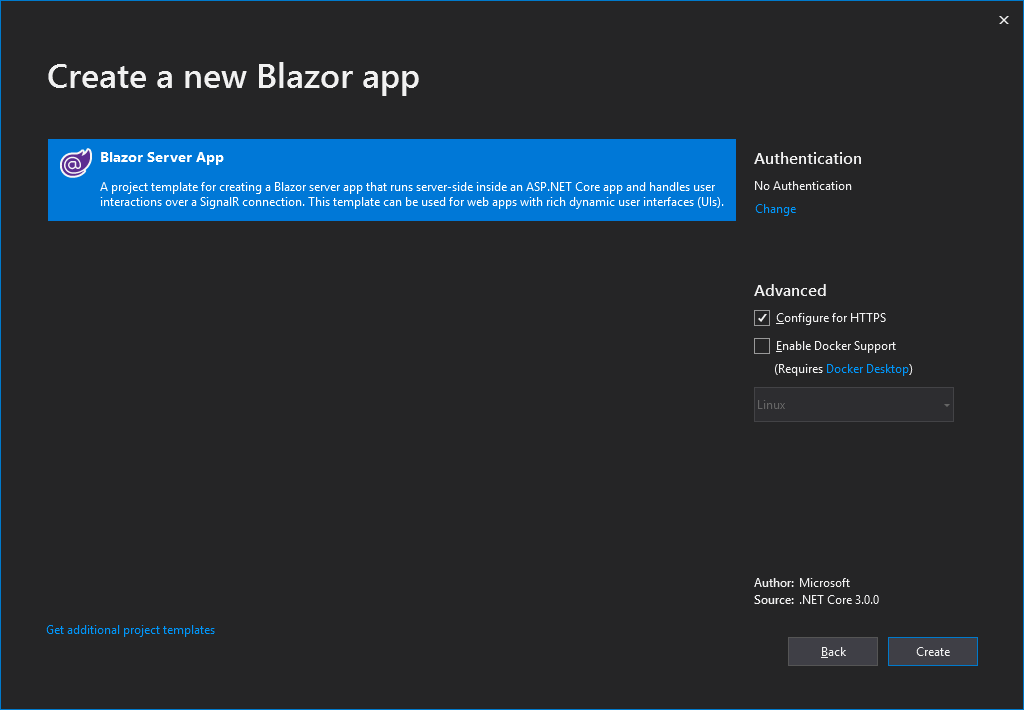
Create a new Blazor app called BlazorWorkshop
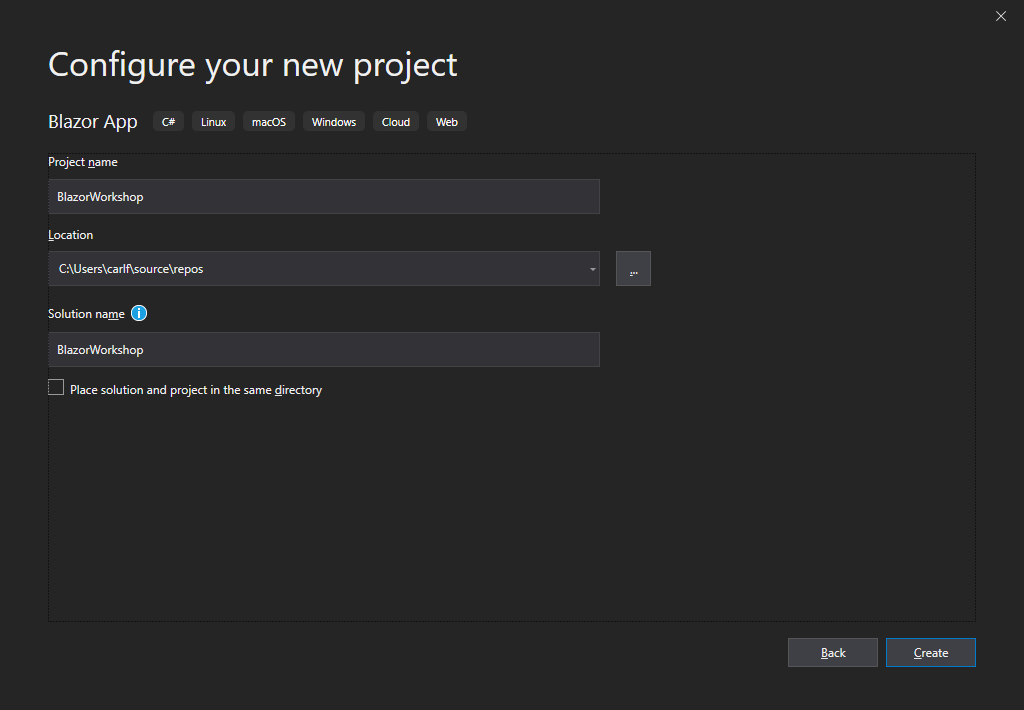
Accept the default options
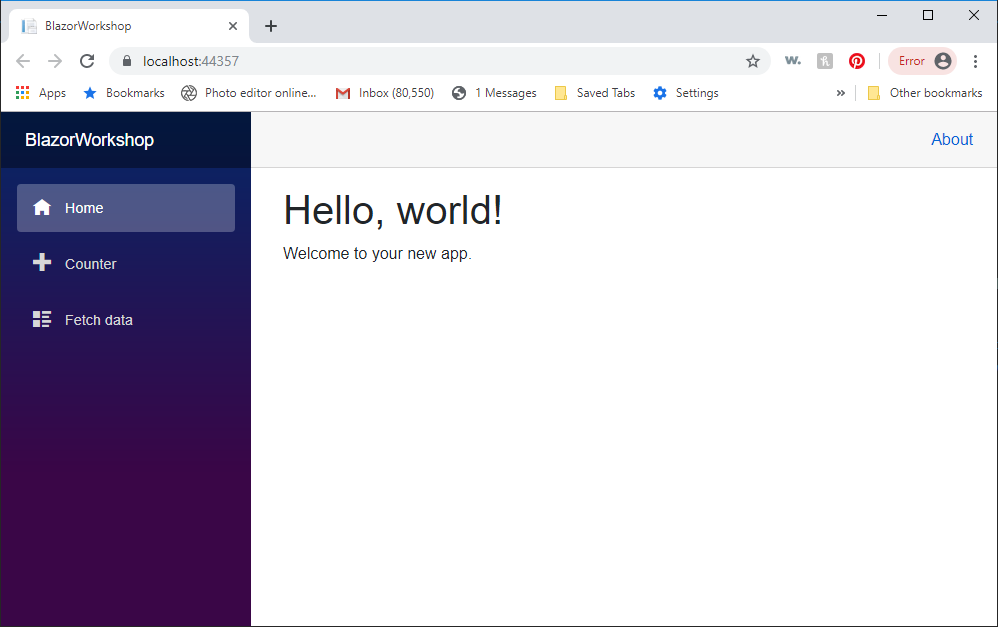
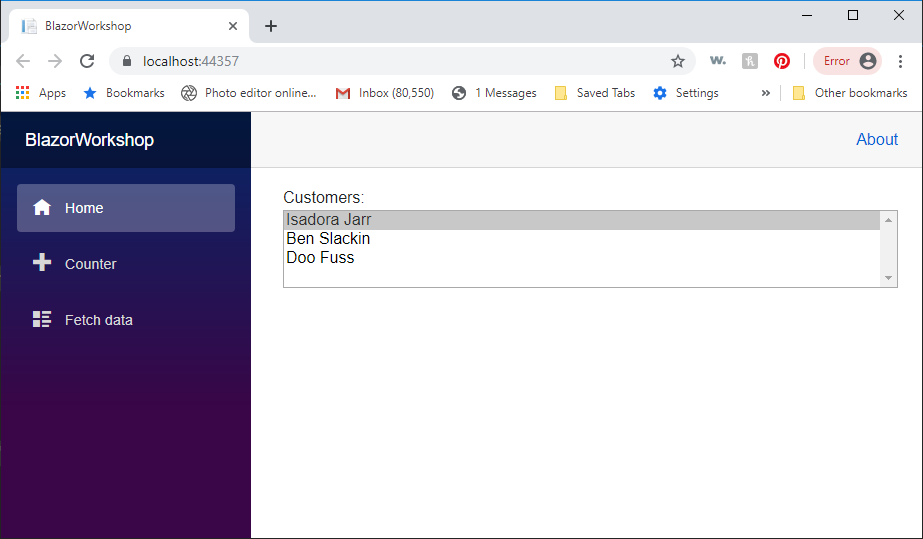
Once loaded, run the app (F5). You'll see this:
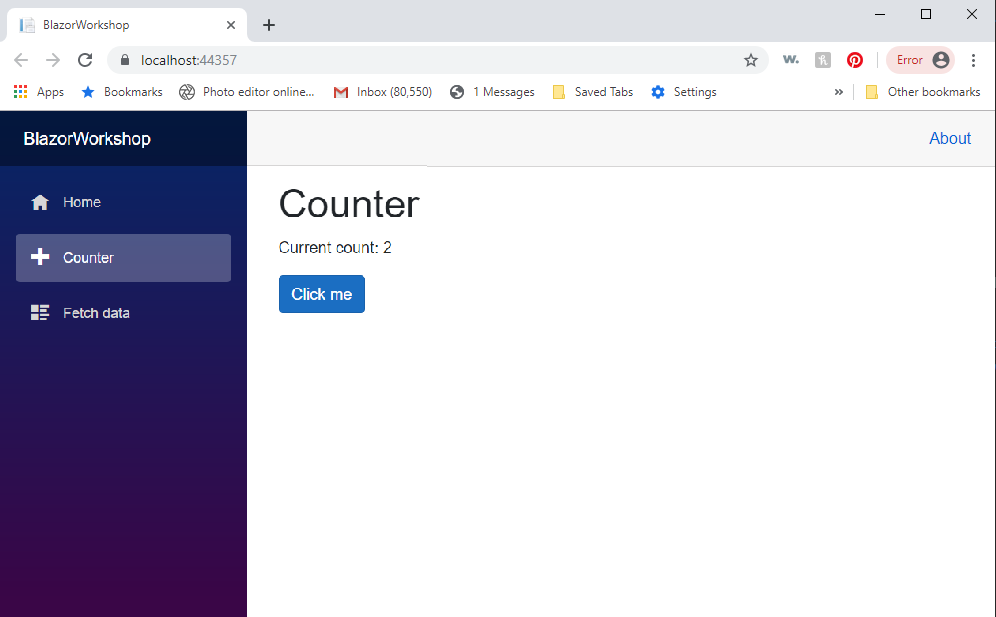
Click on the Counter option on the left and hit the ClickMe button to increase the value on the screen:
Note: if the counter doesn't work, you might be running in Internet Explorer or some other browser that is not supported. Try the latest version of Chrome.
Stop the app and open Counter.razor from the Pages folder
x@page "/counter"<h1>Counter</h1><p>Current count: @currentCount</p><button class="btn btn-primary" @onclick="IncrementCount">Click me</button>@code {int currentCount = 0;void IncrementCount(){currentCount++;}}
There are two sections here, the Razor markup and the code block as specified by @code {}
In the button tag, check out how the click handler is wired up, by using @onclick instead of onclick without an @ sign.
You can think of the IncrementCount() method as running in the browser, but it's actually running on the server. If this was a WebAssembly project (client-side Blazor), it would actually run in the browser.
Server-side Blazor ships UI changes down to the browser using a hidden SignalR hub. When the button is clicked, the browser sends a request via SignalR, the code executes on the server, and any UI changes are sent back to the browser.
Under the Hood
The following information comes right from the Blazor docs at the following URL:
https://docs.microsoft.com/en-us/aspnet/core/blazor/hosting-models?view=aspnetcore-3.0#blazor-server
With the Blazor Server hosting model, the app is executed on the server from within an ASP.NET Core app. UI updates, event handling, and JavaScript calls are handled over a SignalR connection.
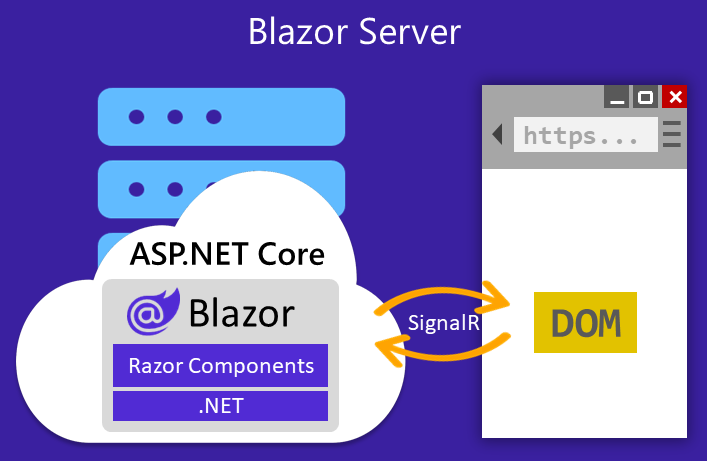
To create a Blazor app using the Blazor Server hosting model, use the ASP.NET Core Blazor Server App template (dotnet new blazorserver). The ASP.NET Core app hosts the Blazor Server app and creates the SignalR endpoint where clients connect.
The ASP.NET Core app references the app's Startup class to add:
- Server-side services.
- The app to the request handling pipeline.
The blazor.server.js script establishes the client connection. It's the app's responsibility to persist and restore app state as required (for example, in the event of a lost network connection).
The Blazor Server hosting model offers several benefits:
- Download size is significantly smaller than a Blazor WebAssembly app, and the app loads much faster.
- The app takes full advantage of server capabilities, including use of any .NET Core compatible APIs.
- .NET Core on the server is used to run the app, so existing .NET tooling, such as debugging, works as expected.
- Thin clients are supported. For example, Blazor Server apps work with browsers that don't support WebAssembly and on resource-constrained devices.
- The app's .NET/C# code base, including the app's component code, isn't served to clients.
There are downsides to Blazor Server hosting:
- Higher latency usually exists. Every user interaction involves a network hop.
- There's no offline support. If the client connection fails, the app stops working.
- Scalability is challenging for apps with many users. The server must manage multiple client connections and handle client state.
- An ASP.NET Core server is required to serve the app. Serverless deployment scenarios aren't possible (for example, serving the app from a CDN).
The blazor.server.js script is served from an embedded resource in the ASP.NET Core shared framework.
Comparison to server-rendered UI
One way to understand Blazor Server apps is to understand how it differs from traditional models for rendering UI in ASP.NET Core apps using Razor views or Razor Pages. Both models use the Razor language to describe HTML content, but they significantly differ in how markup is rendered.
When a Razor Page or view is rendered, every line of Razor code emits HTML in text form. After rendering, the server disposes of the page or view instance, including any state that was produced. When another request for the page occurs, for instance when server validation fails and the validation summary is displayed:
- The entire page is rerendered to HTML text again.
- The page is sent to the client.
A Blazor app is composed of reusable elements of UI called components. A component contains C# code, markup, and other components. When a component is rendered, Blazor produces a graph of the included components similar to an HTML or XML Document Object Model (DOM). This graph includes component state held in properties and fields. Blazor evaluates the component graph to produce a binary representation of the markup. The binary format can be:
- Turned into HTML text (during prerendering).
- Used to efficiently update the markup during regular rendering.
A UI update in Blazor is triggered by:
- User interaction, such as selecting a button.
- App triggers, such as a timer.
The graph is rerendered, and a UI diff (difference) is calculated. This diff is the smallest set of DOM edits required to update the UI on the client. The diff is sent to the client in a binary format and applied by the browser.
A component is disposed after the user navigates away from it on the client. While a user is interacting with a component, the component's state (services, resources) must be held in the server's memory. Because the state of many components might be maintained by the server concurrently, memory exhaustion is a concern that must be addressed. For guidance on how to author a Blazor Server app to ensure the best use of server memory, see Secure ASP.NET Core Blazor Server apps.
(end of content from Blazor documentation)
Unhandled Exceptions
Let's watch what happens in the case of an unhandled exception:
Change the code to throw an exception:
xxxxxxxxxx void IncrementCount() { int zero = 0; double errorNumber = 100 / zero; currentCount++; }When you run the app and click the button on the Counter page , Visual Studio breaks on the exception. Press F5 to continue. Now try to do anything at all in the app. It won't work. Worse, your user has no idea what happened, only that your app became brain-dead.
If you press F12 and look at the console output you'll see that Blazor has severed the SignalR connection completely.
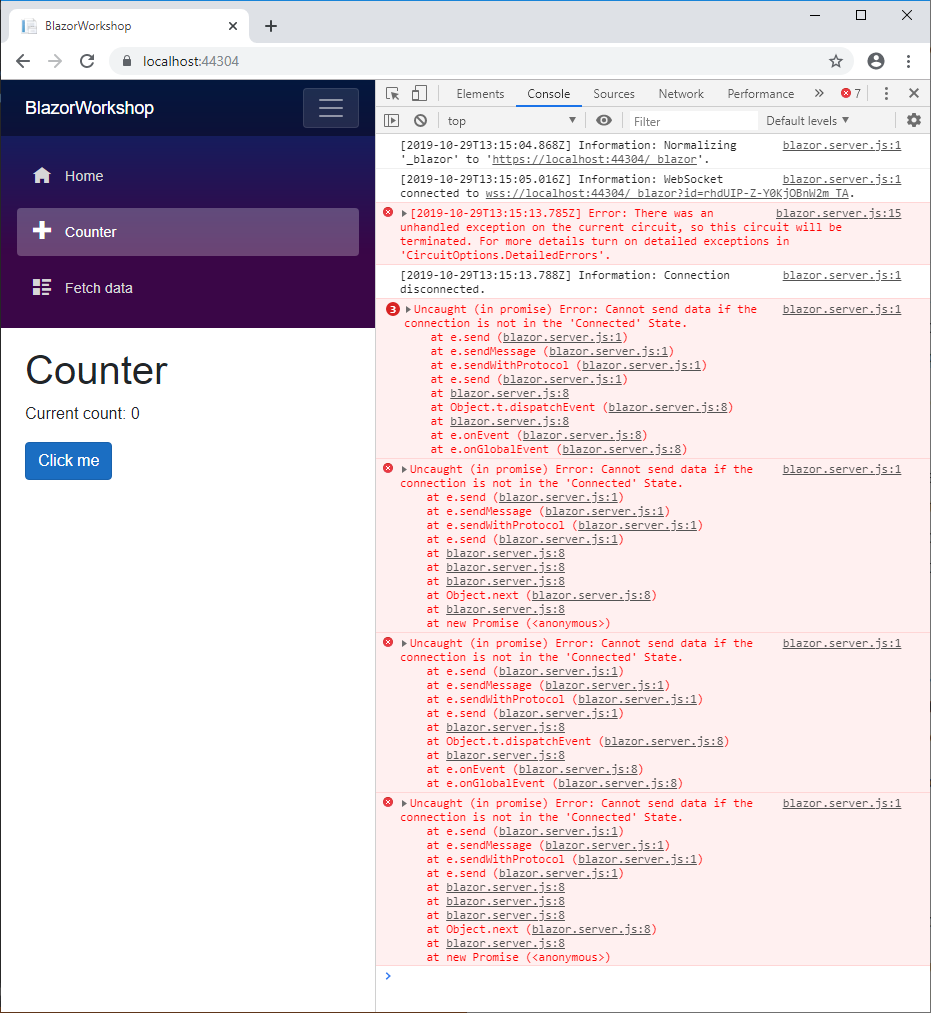
So the moral of the story is to execute server side code in try/catch blocks and fail gracefully. Of course, you should probably develop and test your code without error handling, to make development go faster. Once you're satisfied that your code works, then you can introduce the exception handling and figure out how to tell the user that something went wrong.
Other Oddities
One thing you will notice is that some of the standard features of Visual Studio don't work when you're editing code in a @code block in the razor page itself. For example, if you hit Ctrl-. on a variable name that you've changed, you expect the refactoring list to pop up.
To get the complete experience of editing code in Visual Studio, you probably want to put the code into a class, or a "code behind" class.
Code Behind
Let's do that. Right-click on the Pages folder, and add a new class called Counter.razor.cs
One thing you'll notice is that it automatically lands under the Counter.razor file in the Solution Explorer. Visual Studio is smart enough to know that's where it goes.
Replace the code in Counter.razor.cs with the following:
xxxxxxxxxxusing Microsoft.AspNetCore.Components;using System;using System.Collections.Generic;using System.Linq;using System.Threading.Tasks;namespace BlazorWorkshop.Pages{public class CounterCode : ComponentBase{public int currentCount { get; set; }public void IncrementCount(){currentCount++;}}}
Changes to the code:
- We had to rename the class from Counter, because the page itself is the Counter class.
- We had to subclass the
ComponentBaseclass - We changed
currentCountto a public property - We changed
IncrementCountto a public method.
Let's go back to our Counter page and modify it.
Add the following line to the very top:
@inherits CounterCode
Then, simply delete the @code block. When you're done, it should look like this:
xxxxxxxxxx@inherits CounterCode@page "/counter"<h1>Counter</h1><p>Current count: @currentCount</p><button class="btn btn-primary" @onclick="IncrementCount">Click me</button>
That's it! Now you can edit the code in Counter.razor.cs using the full C# editor and all of its features!
Build your first Component
Components are a great way to encapsulate UI in a single razor file (or file with code behind). Think of them like custom controls for the web written in Razor and C#.
We're going to start with something easy and end up with something really flexible and useful.
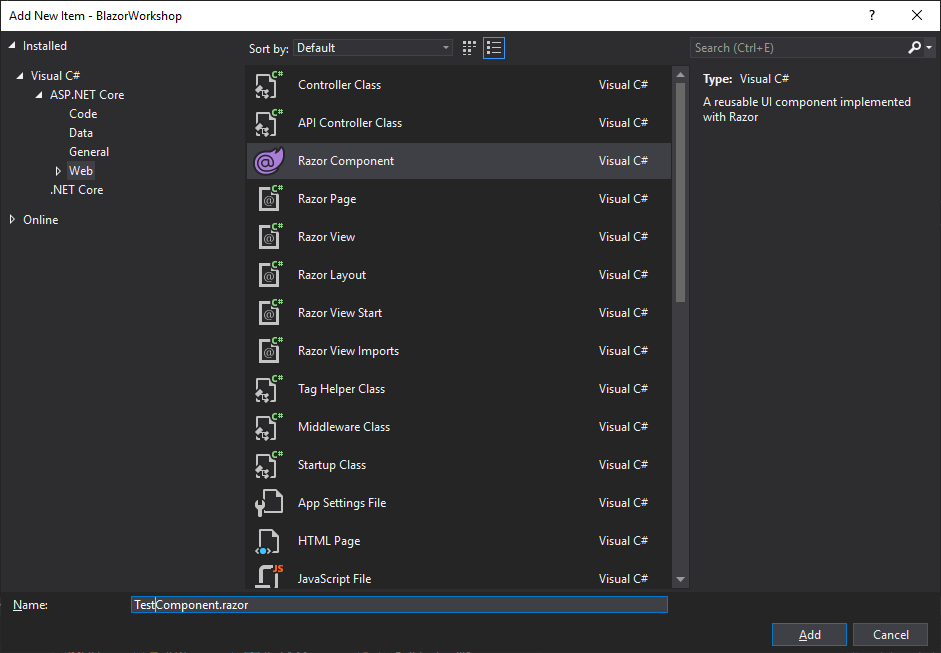
Right-click on the Pages folder and select Add, and then New Item.
From the list on the left, select Web. From the list on the right, select Razor Component. Name it TestComponent.razor.
It should look like this:
xxxxxxxxxx<h3>TestComponent</h3>@code {}
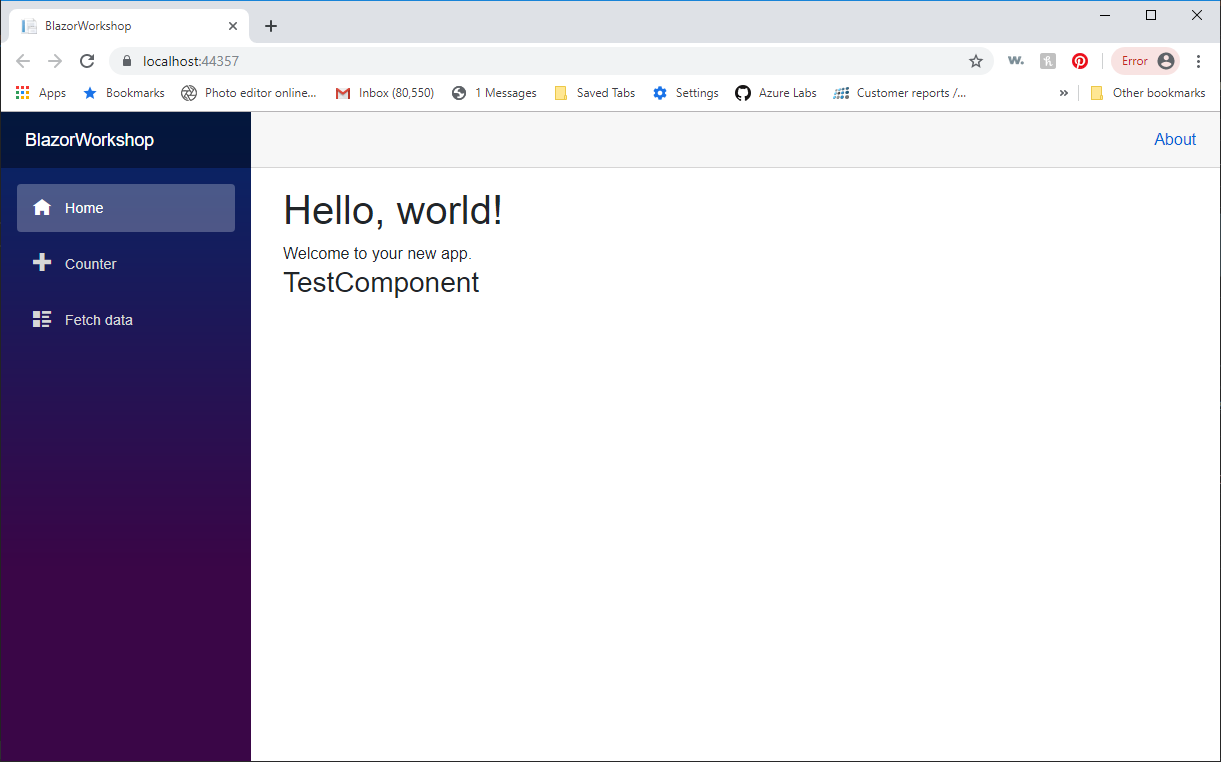
In your Index.razor page, add the following:
<TestComponent/>
It should look like this:
xxxxxxxxxx@page "/"<h1>Hello, world!</h1>Welcome to your new app.<TestComponent/>
Press F5
OK, that was easy. Now let's add some parameters and display some data.
First, add a new class called Customer.cs:
xxxxxxxxxx public class Customer{ public int CustomerId { get; set; } public string Name { get; set; }}Open the TestComponent.razor file and replace it with the following:
xxxxxxxxxx<select size="4" style="width:100%">@foreach (var customer in @Customers){<option value="@customer.CustomerId">@customer.Name</option>}</select>@code {[Parameter]public List<Customer> Customers { get; set; } = new List<Customer>();}
This component takes a list of customers as a parameter, then displays them in a list, using the CustomerId for the option value.
Now, replace the Index.razor file with this:
xxxxxxxxxx "/"
Customers:<TestComponent Customers="Customers"></TestComponent>
{
List<Customer> Customers = new List<Customer>();
protected override void OnInitialized() { Customers.Add( new Customer { CustomerId = 1, Name = "Isadora Jarr" });
Customers.Add( new Customer { CustomerId = 2, Name = "Ben Slackin" });
Customers.Add( new Customer { CustomerId = 3, Name = "Doo Fuss" }); }}protected override void OnInitialized() occurs after the app loads and is ready for coding.
We're just adding 3 Customers to the list so we have something to work with. In the real world, you might call an API or a data service to get your initial data.
Press F5 and it should look like this:
Now that we have a component, let's wire up some events in it.
First, we will add a couple variables to the code block in TestComponent.razor:
xxxxxxxxxx Customer SelectedCustomer;string DisplayMessage = "";SelectedCustomer will represent the customer that the user has clicked on.
DisplayMessage will be shown to the user as feedback.
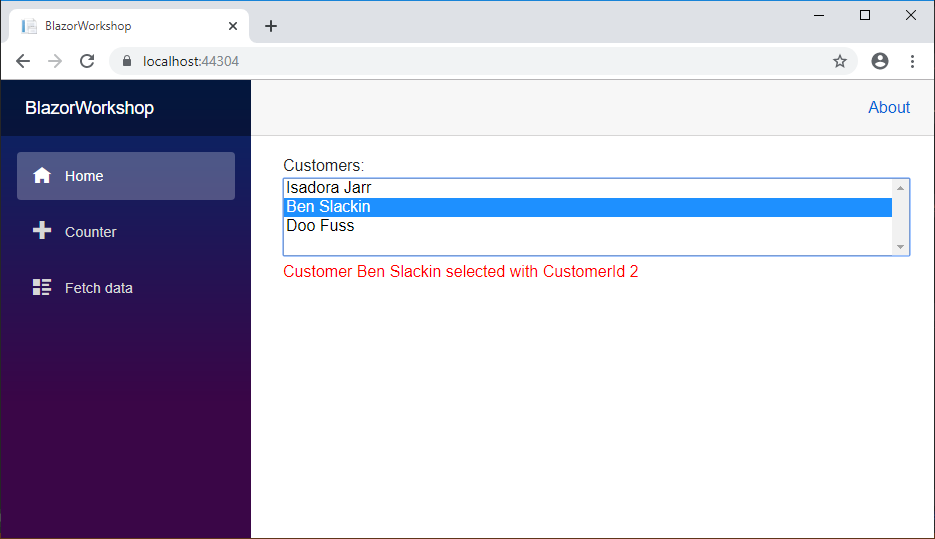
Just below that, let's add a method that will get called whenever the user selects a new customer
xxxxxxxxxx void CustomerSelected(ChangeEventArgs args){ SelectedCustomer = (from x in Customers where x.CustomerId.ToString() == args.Value.ToString() select x).First();
DisplayMessage = string.Format("Customer {0} selected with CustomerId {1}", SelectedCustomer.Name, SelectedCustomer.CustomerId);}If you've used LINQ at all, you should be familiar with the syntax to look up the selected customer.
Now we need to wire up the select tag to call CustomerSelected when the user clicks on a customer name with the @onchange directive:
xxxxxxxxxx <select @onchange="CustomerSelected" size="4" style="width:100%"> @foreach (var customer in @Customers) { <option value="@customer.CustomerId.ToString()">@customer.Name</option> }</select>Just below that, add a span to show the DisplayMessage:
xxxxxxxxxx <span style="color:red" >@DisplayMessage</span> Press F5 and you should see something like this when you select a customer:
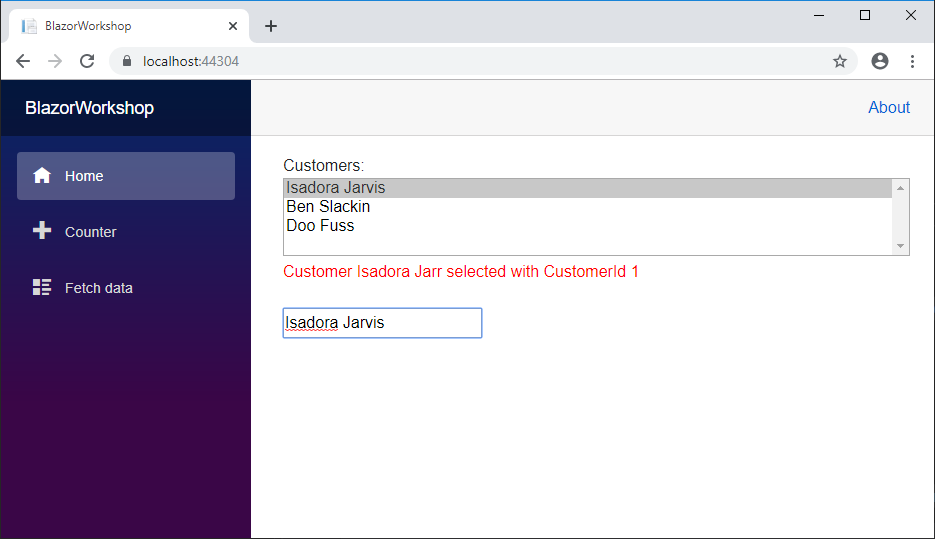
Now let's add an input tag and bind it to the selected customer's name. We will only show the input tag when a customer has been selected. Since the input tag let's us change the customer name, and we're updating the name on every key press, you will see an immediate change in the customer list on every key press.
Add this code below the span:
xxxxxxxxxx <br /><br />
(SelectedCustomer != null){ <input ="@SelectedCustomer.Name" :event="oninput" />}Press F5, select a customer, and start changing the name. You should see something like this:
Let's recap what we just did:
- Added a
DisplayMessagestring, which we show in aspanin red. - Added a
SelectedCustomervariable to store the Customer that was selected in theselect. - Wired the
@onchangeevent to aCustomerSelectedevent handler. CustomerSelectedgetsSelectedCustomerfrom theCustomerscollection and displays information about that customer via theDisplayMessagestring.- Bound an
inputtag to theSelectedCustomer.Nameproperty which changes on every key press. - Only show the
inputtag ifSelectedCustomeris not null.
Since the Customers collection is a parameter, the changes are reflected in the host page (Index.razor) immediately.
Now it's YOUR turn!
Make a change to the code so that the message to the user reflects the changes to the customer name as the user types, just like the select does.
Scroll down for the solution, but try it yourself first!
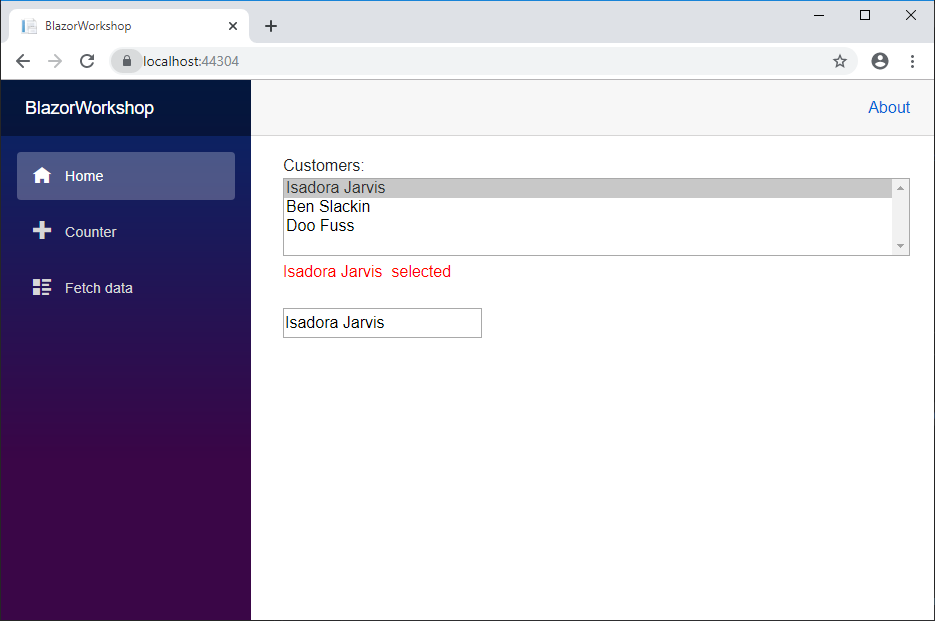
Solution:
The trick is to not copy the information into a string and display the string, but to display the SelectedCustomer.Name directly. For that you have to check for nulls, so move the span into the block where SelectedCustomer is not null:
xxxxxxxxxx (SelectedCustomer != null){ <span style="color:red">.Name selected</span> <br /> <br />
<input ="@SelectedCustomer.Name" :event="oninput" />}Next Step: Add an event handler
Next we're going to add an event handler to our TestComponent, so that when a user is selected, we can notify our calling code.
In the code block, add this second parameter below the first one:
xxxxxxxxxx [Parameter]public EventCallback<Customer> CustomerSelectEvent { get; set; }This defines an event that we can raise in the component, and the host (Index.razor) can handle. The EventCallback requires you pass something, but you can define that yourself. In our case we're going to pass back the SelectedCustomer.
In the CustomerSelected method, let's get rid of the code to set DisplayMessage (because we don't use it any more), and replace it with this:
xxxxxxxxxx CustomerSelectEvent.InvokeAsync(SelectedCustomer).Wait();Yes, it's an async call, and we can handle it in two ways. First is to simply add .Wait() to the end of our call, just like we're doing here. The second way is to make the entire CustomerSelected method async, and then call InvokeAsync with await:
xxxxxxxxxx async Task CustomerSelected(ChangeEventArgs args) { SelectedCustomer = (from x in Customers where x.CustomerId.ToString() == args.Value.ToString() select x).First();
await CustomerSelectEvent.InvokeAsync(SelectedCustomer); }Now let's go back to the host page (Index.razor) and handle the event.
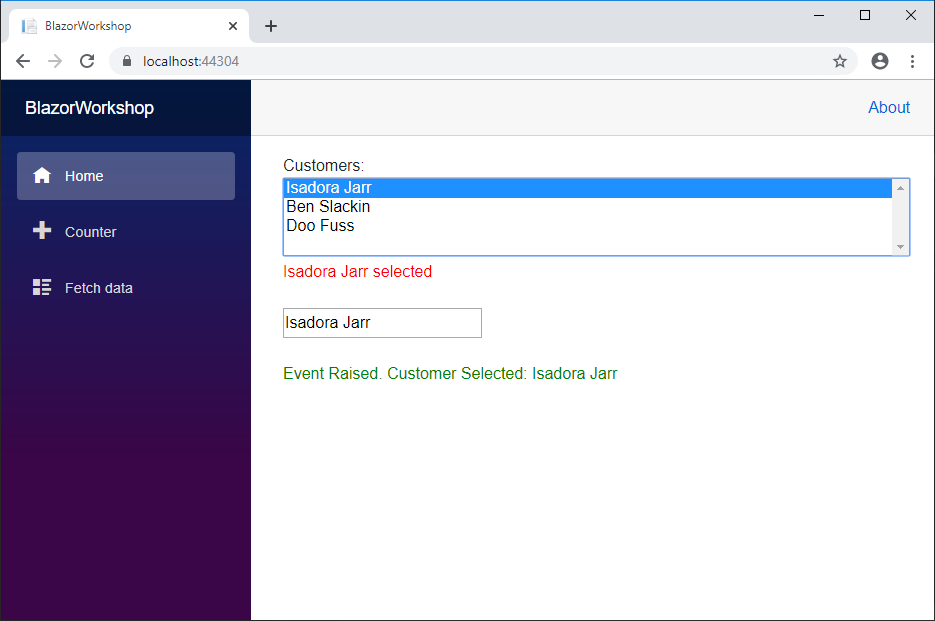
First, let's add a method to handle the event, and a string to display to let the user know we have handled it:
xxxxxxxxxx string DisplayMessage = "";
void CustomerSelected(Customer customer){ DisplayMessage = string.Format("Event Raised. Customer Selected: {0}", customer.Name);}Now, we can pass CustomerSelected as the event handler where we instantiate the component:
xxxxxxxxxx Customers:<TestComponent Customers="Customers" CustomerSelectEvent="CustomerSelected"></TestComponent>Finally, we can add a span to show DisplayMessage, and make the color green to differentiate it from the message displayed in the component:
xxxxxxxxxx <br /><br /><span style="color:green;">@DisplayMessage</span>Your entire Index.razor should look like this now:
xxxxxxxxxx "/"Customers:<TestComponent Customers="Customers" CustomerSelectEvent="CustomerSelected"></TestComponent>
<br /><br /><span style="color:green;"></span>
{
List<Customer> Customers = new List<Customer>();
string DisplayMessage = "";
void CustomerSelected(Customer customer) { DisplayMessage = string.Format("Event Raised. Customer Selected: {0}", customer.Name); }
protected override void OnInitialized() { Customers.Add( new Customer { CustomerId = 1, Name = "Isadora Jarr" });
Customers.Add( new Customer { CustomerId = 2, Name = "Ben Slackin" });
Customers.Add( new Customer { CustomerId = 3, Name = "Doo Fuss" }); }}Press F5, select a customer, and you should see something like this:
Now it's YOUR turn!
Your assignment is to move all the code for the TestComponent into a code-behind class. While you're at it, remove the that shows the selected customer in red, and the DisplayMessage variable as well.
Scroll down for the solution, but try it first!
Solution:
Your TestComponent.razor.cs file should look like this:
xxxxxxxxxx using Microsoft.AspNetCore.Components;using System;using System.Collections.Generic;using System.Linq;using System.Threading.Tasks;
namespace BlazorWorkshop.Pages{ public class TestComponentCode : ComponentBase { [Parameter] public List<Customer> Customers { get; set; } = new List<Customer>();
[Parameter] public EventCallback<Customer> CustomerSelectEvent { get; set; }
public Customer SelectedCustomer;
public async Task CustomerSelected(ChangeEventArgs args) { SelectedCustomer = (from x in Customers where x.CustomerId.ToString() == args.Value.ToString() select x).First();
await CustomerSelectEvent.InvokeAsync(SelectedCustomer); } }}and your TestComponent.razor file should look like this:
xxxxxxxxxx @inherits TestComponentCode
<select @onchange="CustomerSelected" size="4" style="width:100%"> @foreach (var customer in @Customers) { <option value="@customer.CustomerId.ToString()">@customer.Name</option> }</select>
@if (SelectedCustomer != null){ <input @bind="@SelectedCustomer.Name" @bind:event="oninput" />}Next Step: Add API Controller
It's really easy to add an API controller to our Blazor app.
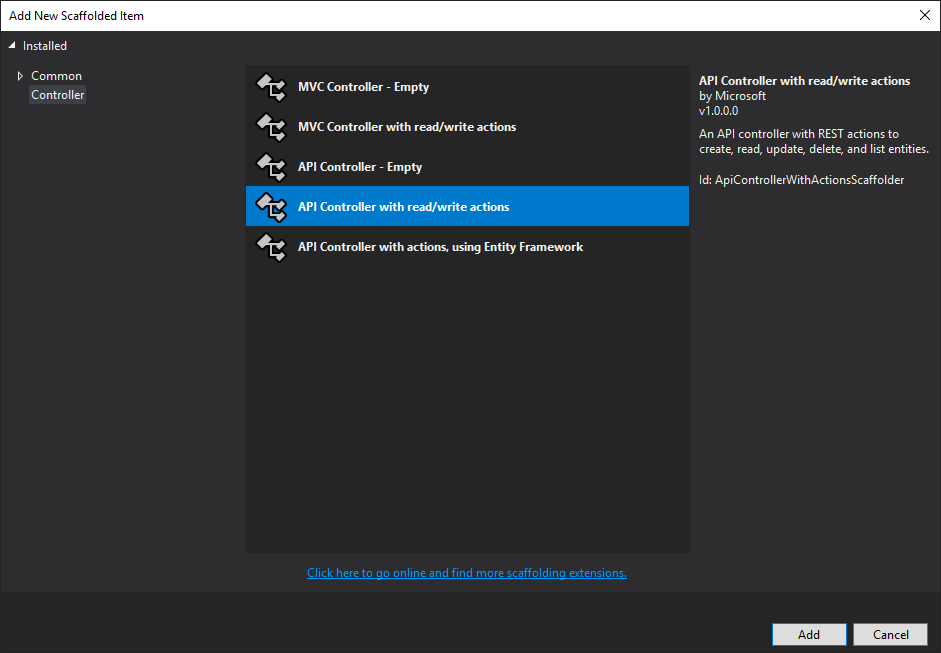
First, create a Controllers folder in the project. Then, right-click, select Add, then Controller
Select the API Controller with read/write actions and click the Add button.
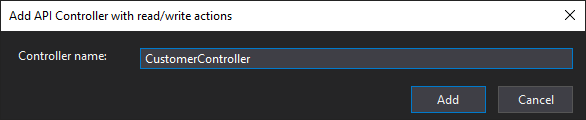
Name it CustomerController and click the Add button.
The next step is to move the code that creates customers out of Index.razor and into this controller.
Change the first method to this:
xxxxxxxxxx // GET: api/Customer [HttpGet] public IEnumerable<Customer> Get() { var Customers = new List<Customer>(); Customers.Add(new Customer { CustomerId = 1, Name = "Isadora Jarr" });
Customers.Add( new Customer { CustomerId = 2, Name = "Ben Slackin" });
Customers.Add( new Customer { CustomerId = 3, Name = "Doo Fuss" }); return Customers; }Next, right-click on the Data folder and add a new class called CustomerService (irony).
Change the baseURL accordingly. You can get that by simply running the app and copying the url out of the browser window, or by reading the sslPort from iisSettings in launchSettings.json under the Properties folder.
xxxxxxxxxx using Newtonsoft.Json;using System;using System.Collections.Generic;using System.Linq;using System.Net.Http;using System.Threading.Tasks;
namespace BlazorWorkshop.Data{ public class CustomerService { /// TODO: Change this to use your app's port number static string baseURL = "https://localhost:44304/";
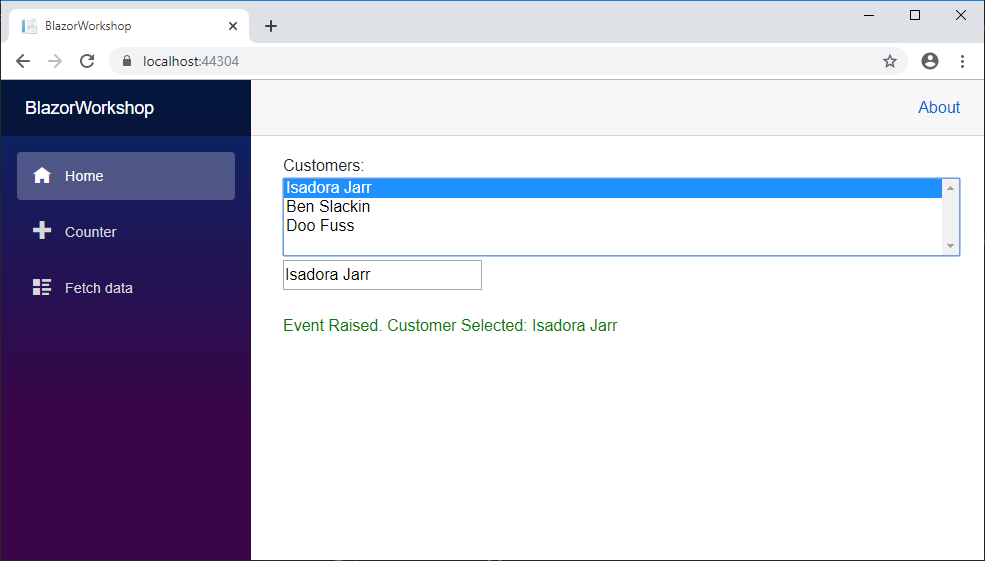
public static async Task<List<Customer>> GetAllCustomers() { try { using (var http = new HttpClient()) { var uri = new Uri(baseURL + "api/customer"); string json = await http.GetStringAsync(uri); var customers = JsonConvert.DeserializeObject<List<Customer>>(json); return customers; } } catch (Exception ex) { return new List<Customer>(); } } }} We will call this service from the same place in Index.razor where we created the customers. We also need to call this method asynchronously, so we'll change OnInitialized to OnInitializedAsync.
xxxxxxxxxx protected override async Task OnInitializedAsync() { Customers = await CustomerService.GetAllCustomers(); }Of course, you now need this at the top right under the @page directive:
xxxxxxxxxx@using BlazorWorkshop.Data
There's one more change we need to do, and that's in startup.cs. Add the following line to the UseEndpoints list at the bottom of the code:
xxxxxxxxxx endpoints.MapControllers();So your UseEndpoints call should look like this:
xxxxxxxxxx app.UseEndpoints(endpoints => { endpoints.MapControllers(); endpoints.MapBlazorHub(); endpoints.MapFallbackToPage("/_Host"); });Now press F5. Your screen shouldn't look any different than it did before, except that now you're retrieving your data from an API endpoint.
Now it's YOUR turn!
Add three more customers to the list of Customers returned by the API with the following names and CustomerId values:
xxxxxxxxxxHugh Jass (4)Donatella Nawan (5)Pykop Andropov (6)
Next Step - Add a Get API for a specific customer
Next, we will add a Get API to retrieve a customer by Id, and some logic in the component to reset a customer after its name has been edited.
In the CustomerController.cs file, move the code that creates customers to a private method and change the Get to call that method:
xxxxxxxxxx private IEnumerable<Customer> GetAllCustomers() { var Customers = new List<Customer>(); Customers.Add(new Customer { CustomerId = 1, Name = "Isadora Jarr" });
Customers.Add( new Customer { CustomerId = 2, Name = "Ben Slackin" });
Customers.Add( new Customer { CustomerId = 3, Name = "Doo Fuss" });
Customers.Add( new Customer { CustomerId = 4, Name = "Hugh Jass" });
Customers.Add( new Customer { CustomerId = 5, Name = "Donatella Nawan" });
Customers.Add( new Customer { CustomerId = 6, Name = "Pykop Andropov" });
return Customers; }
// GET: api/Customer [HttpGet] public IEnumerable<Customer> Get() { return GetAllCustomers(); }Now we can modify the second Get method (that passes an Id) to return the requested customer:
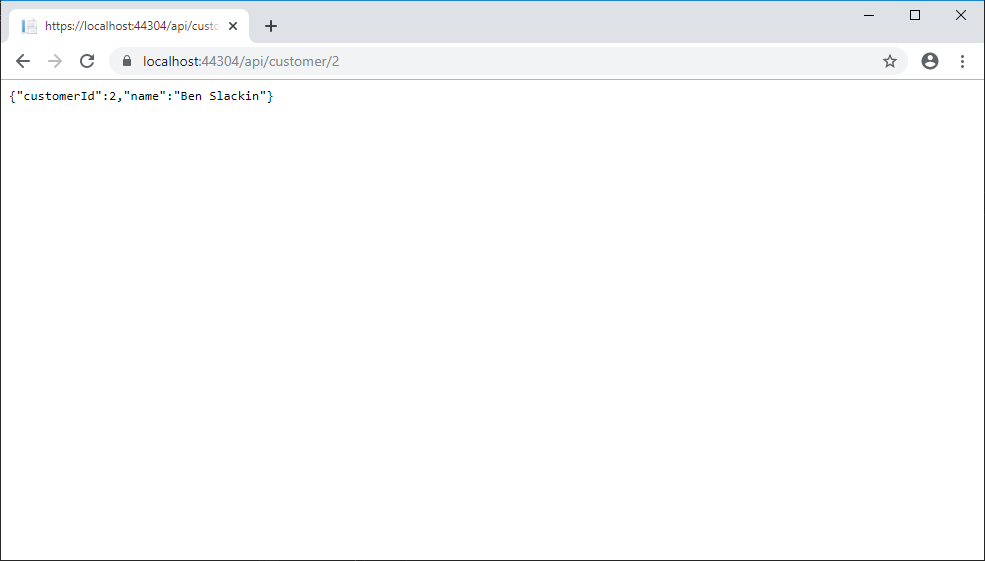
xxxxxxxxxx // GET: api/Customer/5 [HttpGet("{id}", Name = "Get")] public Customer Get(int id) { var customers = GetAllCustomers(); return (from x in customers where x.CustomerId == id select x).FirstOrDefault(); }You can test this immediately. Press F5 and append /api/customer/2 to the url:
Next, add a method to the CustomerService class to retrieve the customer from the API:
xxxxxxxxxx public static async Task<Customer> GetCustomer(int CustomerId) { try { using (var http = new HttpClient()) { var uri = new Uri(baseURL + "api/customer/" + CustomerId.ToString()); string json = await http.GetStringAsync(uri); var customer = JsonConvert.DeserializeObject<Customer>(json); return customer; } } catch (Exception ex) { return new Customer(); } }Now, we need to change up the Index.razor file a bit to be a little more intelligent:
xxxxxxxxxx "/" BlazorWorkshop.Data
Customers:<TestComponent Customers="Customers" SelectedCustomer ="SelectedCustomer" CustomerSelectEvent="CustomerSelected"></TestComponent>
(SelectedCustomer != null){ <br /> <br /> <span style="color:green;">Customer Selected: .Name</span>;}
{
List<Customer> Customers = new List<Customer>();
Customer SelectedCustomer;
void CustomerSelected(Customer customer) { SelectedCustomer = customer; }
protected override async Task OnInitializedAsync() { Customers = await CustomerService.GetAllCustomers(); }}We added a SelectedCustomer variable and removed the DisplayMessage stuff, just like we did earlier in the component itself.
We also pass SelectedCustomer as a parameter, so that the values are bound.
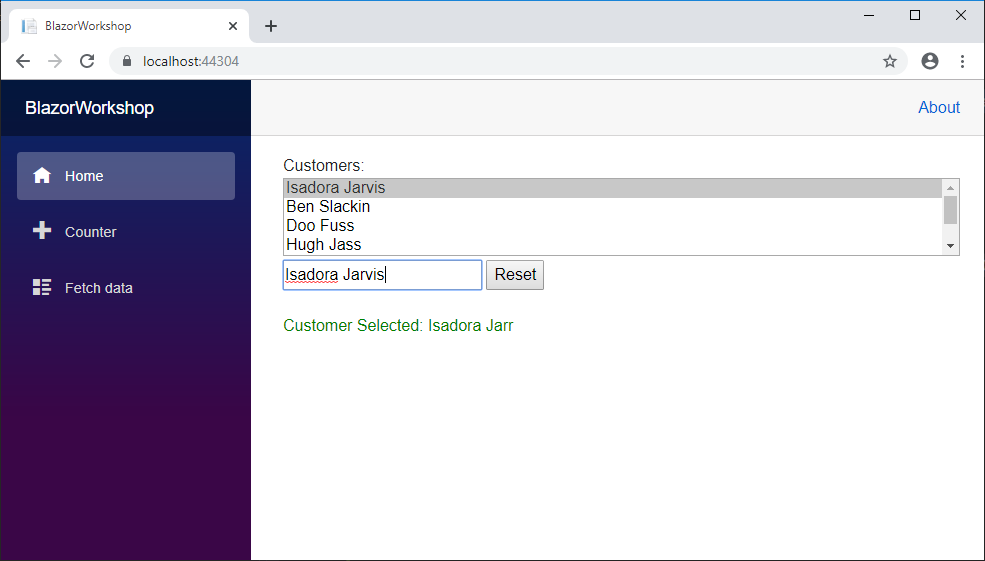
Next, let's modify the markup in the component to make SelectedCustomer a parameter, and also include a Reset button. First, let's add the Reset button to the markup:
xxxxxxxxxx (SelectedCustomer != null){ <input ="@SelectedCustomer.Name" :event="oninput" /> <button ="ResetButtonClicked">Reset</button>}Next, let's modify the code behind:
First, we make SelectedCustomer a parameter:
xxxxxxxxxx [Parameter] public Customer SelectedCustomer { get; set; }Next, we add an EventCallback for a CustomerResetEvent:
xxxxxxxxxx [Parameter] public EventCallback<int> CustomerResetEvent { get; set; }Finally, add the ResetButtonClicked method called when the user clicks the Reset button.
xxxxxxxxxx public async Task ResetButtonClicked() { await CustomerResetEvent.InvokeAsync(SelectedCustomer.CustomerId); }Note that we are passing the CustomerId. There's no need to pass the entire Customer object.
Now, let's jump back into the Index.razor host page and wire up the call to the API via CustomerService.
Add the following event handler:
xxxxxxxxxx async Task CustomerResetting(int CustomerId) { var originalCustomer = await CustomerService.GetCustomer(CustomerId); if (originalCustomer != null) { // replace the customer and reset the SelectedCustomer Customers[Customers.FindIndex( x => x.CustomerId == CustomerId)] = originalCustomer; SelectedCustomer = originalCustomer; } }Here we call, GetCustomer which calls the API and returns the customer. After a quick check to make sure we actually retrieved a customer, we replace the customer in the Customers list with the updated (original) version and replace our SelectedCustomer as well.
Finally, we have to pass the CustomerResetEvent event handler as a parameter:
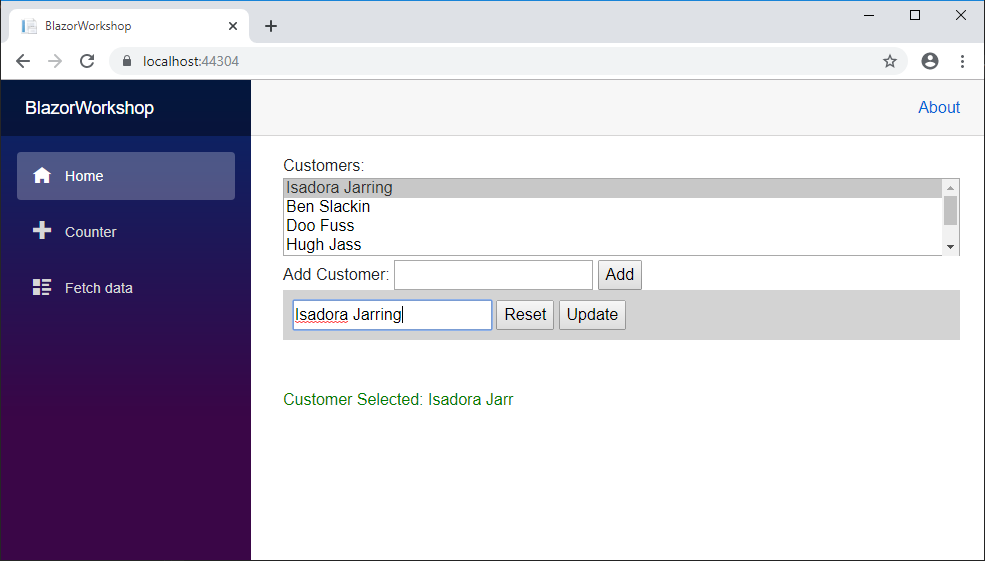
xxxxxxxxxx <TestComponent Customers="Customers" SelectedCustomer ="SelectedCustomer" CustomerSelectEvent="CustomerSelected" CustomerResetEvent="CustomerResetRequested"></TestComponent>Press F5, select the first customer and change the name:
Now hit the Reset button and you'll see the name revert to its original value:

Note: if you notice that the Reset button stays depressed after you click it the first time, you might be using a non-chromium verison of Edge. Some students have noticed this behavior, which does not happen if you use Chrome or an updated version of Edge.
Next Step - Add a Customer via the API
Right now, our list of customers only exists in memory as long as the app is running, so let's do a little cheating and persist the Customers collection in the API to a JSON file.
First, we need to move the Customers list out to the class level and add a string variable for our file name. Add these variables to CustomerController.cs:
xxxxxxxxxx private List<Customer> Customers; private string customerDataFile = "";Next, let's add private methods to load and save the Customers collection:
xxxxxxxxxx private void LoadData() { customerDataFile = Environment.CurrentDirectory + @"\customers.json"; if (!System.IO.File.Exists(customerDataFile)) { Customers = GetAllCustomers(); SaveData(); } else { var json = System.IO.File.ReadAllText(customerDataFile); Customers = JsonConvert.DeserializeObject<List<Customer>>(json); } }
private void SaveData() { var json = JsonConvert.SerializeObject(Customers); System.IO.File.WriteAllText(customerDataFile, json); }You'll also need this:
xxxxxxxxxxusing Newtonsoft.Json;
Next, let's modify the GetAllCustomers method to populate the class-level Customers collection:
xxxxxxxxxx private List<Customer> GetAllCustomers() { if (Customers == null) { Customers = new List<Customer>(); Customers.Add(new Customer { CustomerId = 1, Name = "Isadora Jarr" });
Customers.Add( new Customer { CustomerId = 2, Name = "Ben Slackin" });
Customers.Add( new Customer { CustomerId = 3, Name = "Doo Fuss" });
Customers.Add( new Customer { CustomerId = 4, Name = "Hugh Jass" });
Customers.Add( new Customer { CustomerId = 5, Name = "Donatella Nawan" });
Customers.Add( new Customer { CustomerId = 6, Name = "Pykop Andropov" }); }
return Customers; }Now, we need to ensure the data is loaded when the controller is instantiated, so we add a call to LoadData() in the constructor:
xxxxxxxxxxpublic CustomerController(){LoadData();}
Now, no matter which API method we call, Customers will always be populated with the latest data.
Change the two Get methods as follows:
xxxxxxxxxx // GET: api/Customer [HttpGet] public IEnumerable<Customer> Get() { return Customers; }
// GET: api/Customer/5 [HttpGet("{id}", Name = "Get")] public Customer Get(int id) { return (from x in Customers where x.CustomerId == id select x).FirstOrDefault(); }Finally, we will flesh out the Post method, which gets called to add a customer:
xxxxxxxxxx // POST: api/Customer [HttpPost] public void Post([FromBody] Customer value) { Customers.Add(value); SaveData(); }Now, let's flip over to CustomerService.cs and add a method to call this API:
xxxxxxxxxx public static async Task AddCustomer(Customer Customer) { using (var http = new HttpClient()) { var uri = new Uri(baseURL + "api/customer"); string json = JsonConvert.SerializeObject(Customer); var content = new StringContent(json, Encoding.UTF8, "application/json"); await http.PostAsync(uri, content); } }And we'll need this, then:
xxxxxxxxxxusing System.Text;
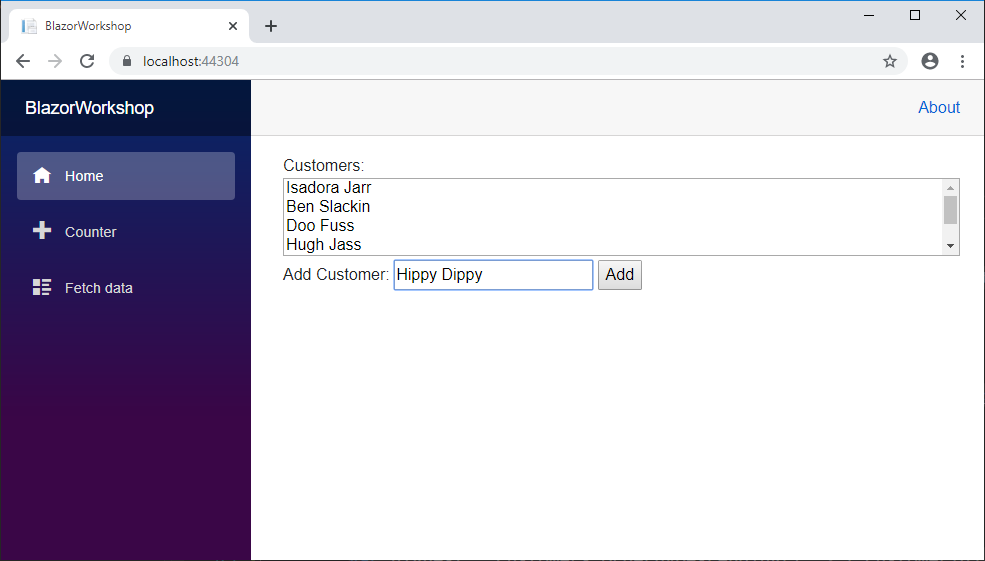
Now we're ready to update our UI. Edit the component markup (TestComponent.razor) and add this markup right below the select tag:
xxxxxxxxxx <br/> Add Customer: <input @bind="@NewCustomerName" /> <button @onclick="CustomerAdding">Add</button> <br/>Now we have to add a couple items to the code behind:
xxxxxxxxxx public string NewCustomerName = "";
[Parameter] public EventCallback<string> AddCustomerEvent { get; set; }
public async Task CustomerAdding() { await AddCustomerEvent.InvokeAsync(NewCustomerName); }NewCustomerName is simply a string bound to the new input tag value.
CustomerAdding() gets called when the user clicks the Add button.
Finally, we added an AddCustomerEvent EventCallback that we can handle in the host.
Let's do that now. Open Index.razor and add this method to the Code block:
xxxxxxxxxx async Task CustomerAdding(string Name) { var highest = Customers.OrderByDescending(i => i.CustomerId).Take(1).First(); var customer = new Customer() { CustomerId = highest.CustomerId + 1, Name = Name }; await CustomerService.AddCustomer(customer); Customers = await CustomerService.GetAllCustomers(); }The first line gets the customer with the highest CustomerId value. We will then increment that for our new Customer. After calling the API to add the new Customer, we need to refresh the Customers list. We could, I suppose, just add this new Customer to the Customers collection, but we might as well get the source of truth, in case anyone else has added or modified customers.
Lastly, we need to add our CustomerAdding event to the parameters when we instantiate the component:
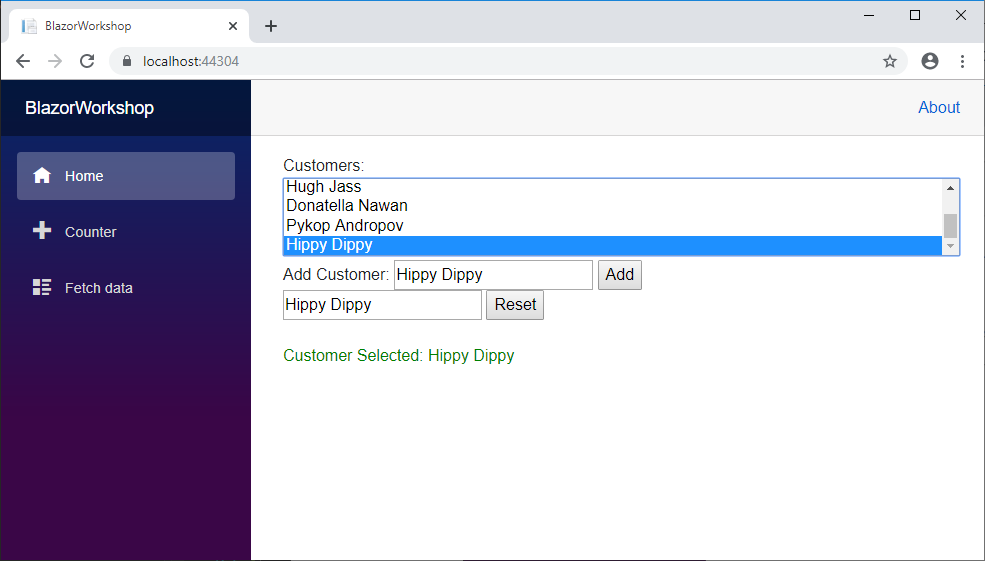
xxxxxxxxxx <TestComponent Customers="Customers" SelectedCustomer="SelectedCustomer" CustomerSelectEvent="CustomerSelected" AddCustomerEvent="CustomerAdding" CustomerResetEvent="CustomerResetting"></TestComponent>Press F5. Enter a new name in the input tag:
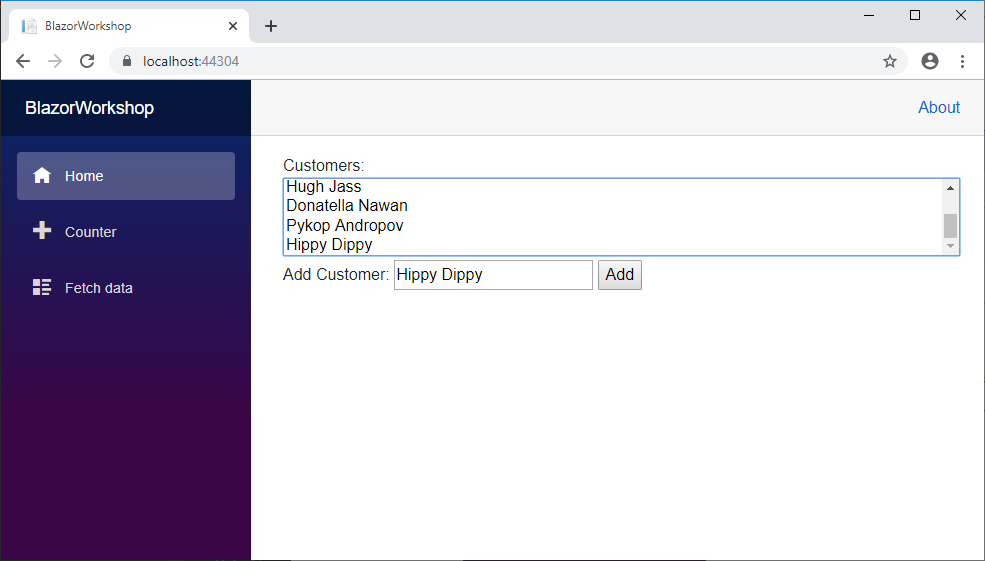
Press the Add button, then scroll the list to the bottom, and you should see the new customer listed:
Select it. The editor and reset button appears.
You can test the persistence by re-running the app. If you want to start over, delete the customers.json file.
Now it's YOUR turn!
Add code to clear the Add Customer input tag after clicking the Add button.
Scroll down for the solution, but try it yourself first!
Solution:
The best place to do this is in the component itself after the host has added the new customer:
xxxxxxxxxx public async Task CustomerAdding() { await AddCustomerEvent.InvokeAsync(NewCustomerName); NewCustomerName = ""; }Next Step: Update a Customer
Next we'll flesh out the code to update a customer starting with the API:
xxxxxxxxxx // PUT: api/Customer/5 [HttpPut("{id}")] public void Put(int id, [FromBody] Customer value) { // replace the customer Customers[Customers.FindIndex( x => x.CustomerId == id)] = value; SaveData(); }Next, add this method to CustomerService.cs:
xxxxxxxxxx public static async Task UpdateCustomer(Customer Customer) { using (var http = new HttpClient()) { var uri = new Uri(baseURL + "api/customer/" + Customer.CustomerId.ToString()); string json = JsonConvert.SerializeObject(Customer); var content = new StringContent(json, Encoding.UTF8, "application/json"); var result = await http.PutAsync(uri, content); if (result.StatusCode != System.Net.HttpStatusCode.OK) { throw new Exception("Customer was not updated"); } } }Next, we'll add the markup to the component to support it. We can also take this opportunity to pretty up our component edit fields by putting a div around them with some padding and a new background color for contrast:
xxxxxxxxxx @if (SelectedCustomer != null){ <div style="background-color:lightgray;padding:1vw;"> <input @bind="@SelectedCustomer.Name" @bind:event="oninput" /> <button @onclick="ResetButtonClicked">Reset</button> <button @onclick="UpdateButtonClicked">Update</button> </div>}Next, add the required code to the code behind:
xxxxxxxxxx [Parameter] public EventCallback<Customer> UpdateCustomerEvent { get; set; } public async Task UpdateButtonClicked() { await UpdateCustomerEvent.InvokeAsync(SelectedCustomer); }Next, add an event handler in Index.razor:
xxxxxxxxxx async Task CustomerUpdating(Customer Customer) { await CustomerService.UpdateCustomer(Customer); Customers = await CustomerService.GetAllCustomers(); }And finally, pass the event handler parameter to the component:
xxxxxxxxxx Customers:<TestComponent Customers="Customers" SelectedCustomer="SelectedCustomer" CustomerSelectEvent="CustomerSelected" CustomerResetEvent="CustomerResetting" AddCustomerEvent="CustomerAdding" UpdateCustomerEvent="CustomerUpdating" ></TestComponent>Press F5, select the first Customer, and change the name:
Now press the Update button, and then press the Reset button. You'll notice that the name has been permanently changed.
Now it's YOUR turn!
Add the ability to delete the selected customer. Start with the API, then add the CustomerService method, then add the delete button and code to the component, which should raise an event to the host to notify that the user wants to delete a customer. You do not need to pass the whole customer object, just the CustomerId.
Scroll down for the solution.
Solution:
Delete Action in API:
xxxxxxxxxx // DELETE: api/ApiWithActions/5 [HttpDelete("{id}")] public void Delete(int id) { var customer = Customers[Customers.FindIndex( x => x.CustomerId == id)]; Customers.Remove(customer); SaveData(); }CustomerSercvice method:
xxxxxxxxxx public static async Task DeleteCustomer(int CustomerId) { using (var http = new HttpClient()) { var uri = new Uri(baseURL + "api/customer/" + CustomerId.ToString()); var result = await http.DeleteAsync(uri); if (result.StatusCode != System.Net.HttpStatusCode.OK) { throw new Exception("Customer was not deleted"); } } }Add update button to component:
xxxxxxxxxx @if (SelectedCustomer != null){ <div style="background-color:lightgray;padding:1vw;"> <input @bind="@SelectedCustomer.Name" @bind:event="oninput" /> <button @onclick="ResetButtonClicked">Reset</button> <button @onclick="UpdateButtonClicked">Update</button> <button @onclick="DeleteButtonClicked">Delete</button> </div>}Code behind:
xxxxxxxxxx [Parameter] public EventCallback<int> DeleteCustomerEvent { get; set; } public async Task DeleteButtonClicked() { await DeleteCustomerEvent.InvokeAsync(SelectedCustomer.CustomerId); }Host component instantiation passing delete event handler:
xxxxxxxxxx Customers:<TestComponent Customers="Customers" SelectedCustomer="SelectedCustomer" CustomerSelectEvent="CustomerSelected" CustomerResetEvent="CustomerResetting" AddCustomerEvent="CustomerAdding" UpdateCustomerEvent="CustomerUpdating" DeleteCustomerEvent="CustomerDeleting" ></TestComponent>Event handler:
xxxxxxxxxx async Task CustomerDeleting(int CustomerId) { await CustomerService.DeleteCustomer(CustomerId); Customers = await CustomerService.GetAllCustomers(); }Take your new app for a spin! Press F5
Next Step: Form Validation
Blazor has built-in versions of DOM input objects that support validation. What's more, you can define the rules as property attributes in your classes.
Let's add to our Customer class and set up some rules:
xxxxxxxxxx using System.ComponentModel.DataAnnotations;
namespace BlazorWorkshop{ public class Customer { public int CustomerId { get; set; }
[Required] [StringLength(50, ErrorMessage = "Name is too long.")] public string Name { get; set; }
[Required] [EmailAddress(ErrorMessage = "Not a valid Email Address")] [StringLength(50, ErrorMessage = "Email is too long.")] public string Email { get; set; }
}}The Name and Email properties are both required and both have a maximum length of 50.
The Email property has been tagged as an Email address. Blazor will validate this for you. No RegEx required!
Now let's replace the input tags in the component with the new Blazor controls, and wrap them in an EditForm element. For the time being, let's comment out the Add Customer UI:
xxxxxxxxxx @inherits TestComponentCode
<select @onchange="CustomerSelected" size="4" style="width:100%"> @foreach (var customer in @Customers) { <option value="@customer.CustomerId.ToString()">@customer.Name</option> }</select>
@*Add Customer: <input @bind="@NewCustomerName" /> <button @onclick="CustomerAdding">Add</button> <br />*@
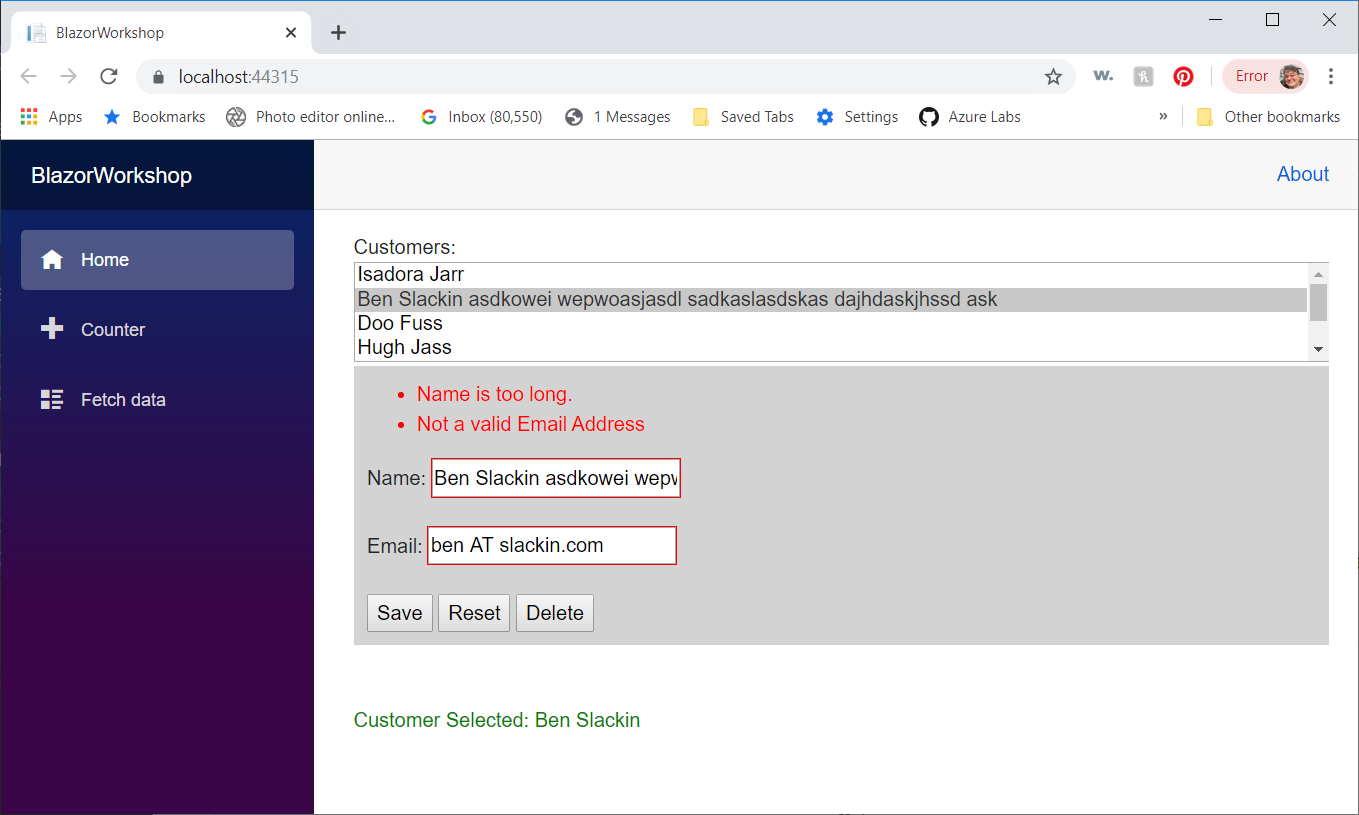
@if (SelectedCustomer != null){ <div style="background-color:lightgray;padding:1vw;"> <EditForm Model="@SelectedCustomer" OnValidSubmit="@UpdateButtonClicked"> <DataAnnotationsValidator /> <ValidationSummary />
Name: <InputText id="name" @bind-Value="@SelectedCustomer.Name" /> <br /> <br />
Email: <InputText id="email" @bind-Value="@SelectedCustomer.Email" /> <br /> <br />
<button type="submit">Save</button> <button type="button" @onclick="ResetButtonClicked">Reset</button> <button type="button" @onclick="DeleteButtonClicked">Delete</button> </EditForm> </div>}Here we tell the EditForm we are using the SelectedCustomer object as the validation model. It will pull the attributes from the Customer class and enforce them.
Instead of using Input elements, we are now using InputText elements, which have the features we need to interact with the validators.
Notice that all the buttons except for the Submit button are defined with type=button so they don't trigger the submit.
Next, we need to modify the code that creates our initial customers in the CustomerController.cs file to also include an email address:
xxxxxxxxxx private List<Customer> GetAllCustomers() { if (Customers == null) { Customers = new List<Customer>(); Customers.Add(new Customer { CustomerId = 1, Name = "Isadora Jarr", Email = "isadora@jarr.com" });
Customers.Add( new Customer { CustomerId = 2, Name = "Ben Slackin", Email = "ben@slackin.com" });
Customers.Add( new Customer { CustomerId = 3, Name = "Doo Fuss", Email = "doo@fuss.com" });
Customers.Add( new Customer { CustomerId = 4, Name = "Hugh Jass", Email = "hugh@jass.com" });
Customers.Add( new Customer { CustomerId = 5, Name = "Donatella Nawan", Email ="donatella@nawan.com" });
Customers.Add( new Customer { CustomerId = 6, Name = "Pykop Andropov", Email = "pykop@andropov.com" }); }
return Customers; }Before you run, locate and delete the customers.json file in the Solution Explorer.
Press F5, select a customer and try to fire the validation by making the name too long or the email invalid, or try removing the values all together.
Next Step: Add Customer with Validation
Next, let's use the component to add a new customer so we can take advantage of the validation features of the EditForm element.
Change the commented-out Add Button in TestComponent.razor to this:
xxxxxxxxxx <button @onclick="CustomerAdding">Add Customer</button>Next, in the code behind, we'll modify the AddCustomerEvent EventCallback to pass a Customer rather than just a name, and also add some support code:
xxxxxxxxxx [Parameter] public EventCallback<Customer> AddCustomerEvent { get; set; } bool Adding = false; public void CustomerAdding() { SelectedCustomer = new Customer(); Adding = true; }When the Add button is clicked, we set the SelectedCustomer to a new customer, and the binding takes over, complete with validation.
The Adding boolean tells us what event to raise when the Update button is clicked:
xxxxxxxxxx public async Task UpdateButtonClicked() { if (Adding) { Adding = false; await AddCustomerEvent.InvokeAsync(SelectedCustomer); } else { await UpdateCustomerEvent.InvokeAsync(SelectedCustomer); } }Now, we need to modify the CustomerAdding method in Index.razor to accept a Customer. It actually simplifies things a little:
xxxxxxxxxx async Task CustomerAdding(Customer Customer) { var highest = Customers.OrderByDescending(i => i.CustomerId).Take(1).First(); Customer.CustomerId = highest.CustomerId + 1; await CustomerService.AddCustomer(Customer); SelectedCustomer = Customer; Customers = await CustomerService.GetAllCustomers(); }Code Check
At this point your code should look like this:
Index.razor:
xxxxxxxxxx "/" BlazorWorkshop.Data
Customers:<TestComponent Customers="Customers" SelectedCustomer="SelectedCustomer" CustomerSelectEvent="CustomerSelected" CustomerResetEvent="CustomerResetting" AddCustomerEvent="CustomerAdding" UpdateCustomerEvent="CustomerUpdating" DeleteCustomerEvent="CustomerDeleting" ></TestComponent>
(SelectedCustomer != null){ <br /> <br /> <span style="color:green;">Customer Selected: .Name</span>;}
{
List<Customer> Customers = new List<Customer>();
Customer SelectedCustomer;
async Task CustomerDeleting(int CustomerId) { await CustomerService.DeleteCustomer(CustomerId); Customers = await CustomerService.GetAllCustomers(); }
async Task CustomerUpdating(Customer Customer) { await CustomerService.UpdateCustomer(Customer); Customers = await CustomerService.GetAllCustomers(); }
async Task CustomerAdding(Customer Customer) { var highest = Customers.OrderByDescending(i => i.CustomerId).Take(1).First(); Customer.CustomerId = highest.CustomerId + 1; await CustomerService.AddCustomer(Customer); SelectedCustomer = Customer; Customers = await CustomerService.GetAllCustomers(); }
async Task CustomerResetting(int CustomerId) { var originalCustomer = await CustomerService.GetCustomer(CustomerId); if (originalCustomer != null) { // replace the customer and reset the SelectedCustomer Customers[Customers.FindIndex( x => x.CustomerId == CustomerId)] = originalCustomer; SelectedCustomer = originalCustomer; } }
void CustomerSelected(Customer customer) { SelectedCustomer = customer; }
protected override async Task OnInitializedAsync() { Customers = await CustomerService.GetAllCustomers(); }}TestComponent.razor:
xxxxxxxxxx @inherits TestComponentCode
<select @onchange="CustomerSelected" size="4" style="width:100%"> @foreach (var customer in @Customers) { <option value="@customer.CustomerId.ToString()">@customer.Name</option> }</select>
<button @onclick="CustomerAdding">Add Customer</button>
@if (SelectedCustomer != null){ <div style="background-color:lightgray;padding:1vw;"> <EditForm Model="@SelectedCustomer" OnValidSubmit="@UpdateButtonClicked"> <DataAnnotationsValidator /> <ValidationSummary />
Name: <InputText id="name" @bind-Value="@SelectedCustomer.Name" /> <br /> <br />
Email: <InputText id="email" @bind-Value="@SelectedCustomer.Email" /> <br /> <br />
<button type="submit">Save</button> <button type="button" @onclick="ResetButtonClicked">Reset</button> <button type="button" @onclick="DeleteButtonClicked">Delete</button> </EditForm> </div>}TestComponent.razor.cs:
xxxxxxxxxx using Microsoft.AspNetCore.Components;using System;using System.Collections.Generic;using System.Linq;using System.Threading.Tasks;
namespace BlazorWorkshop.Pages{ public class TestComponentCode : ComponentBase { [Parameter] public List<Customer> Customers { get; set; } = new List<Customer>();
[Parameter] public EventCallback<Customer> CustomerSelectEvent { get; set; }
[Parameter] public Customer SelectedCustomer { get; set; }
[Parameter] public EventCallback<int> CustomerResetEvent { get; set; }
public string DisplayMessage = "";
public async Task ResetButtonClicked() { await CustomerResetEvent.InvokeAsync(SelectedCustomer.CustomerId); }
public async Task CustomerSelected(ChangeEventArgs args) { SelectedCustomer = (from x in Customers where x.CustomerId.ToString() == args.Value.ToString() select x).First();
await CustomerSelectEvent.InvokeAsync(SelectedCustomer); }
public string NewCustomerName = "";
[Parameter] public EventCallback<Customer> AddCustomerEvent { get; set; } bool Adding = false;
public void CustomerAdding() { SelectedCustomer = new Customer(); Adding = true; }
[Parameter] public EventCallback<Customer> UpdateCustomerEvent { get; set; } public async Task UpdateButtonClicked() { if (Adding) { Adding = false; await AddCustomerEvent.InvokeAsync(SelectedCustomer); } else { await UpdateCustomerEvent.InvokeAsync(SelectedCustomer); } }
[Parameter] public EventCallback<int> DeleteCustomerEvent { get; set; } public async Task DeleteButtonClicked() { await DeleteCustomerEvent.InvokeAsync(SelectedCustomer.CustomerId); } }}CustomerController.cs:
xxxxxxxxxx using System;using System.Collections.Generic;using System.Linq;using System.Threading.Tasks;using Microsoft.AspNetCore.Http;using Microsoft.AspNetCore.Mvc;using Newtonsoft.Json;
namespace BlazorWorkshop.Controllers{ [Route("api/[controller]")] [ApiController] public class CustomerController : ControllerBase { private List<Customer> Customers; private string customerDataFile = "";
public CustomerController() { LoadData(); }
private List<Customer> GetAllCustomers() { if (Customers == null) { Customers = new List<Customer>(); Customers.Add(new Customer { CustomerId = 1, Name = "Isadora Jarr", Email = "isadora@jarr.com" });
Customers.Add( new Customer { CustomerId = 2, Name = "Ben Slackin", Email = "ben@slackin.com" });
Customers.Add( new Customer { CustomerId = 3, Name = "Doo Fuss", Email = "doo@fuss.com" });
Customers.Add( new Customer { CustomerId = 4, Name = "Hugh Jass", Email = "hugh@jass.com" });
Customers.Add( new Customer { CustomerId = 5, Name = "Donatella Nawan", Email = "donatella@nawan.com" });
Customers.Add( new Customer { CustomerId = 6, Name = "Pykop Andropov", Email = "pykop@andropov.com" }); }
return Customers; }
// GET: api/Customer [HttpGet] public IEnumerable<Customer> Get() { return Customers; }
// GET: api/Customer/5 [HttpGet("{id}", Name = "Get")] public Customer Get(int id) { return (from x in Customers where x.CustomerId == id select x).FirstOrDefault(); }
// POST: api/Customer [HttpPost] public void Post([FromBody] Customer value) { Customers.Add(value); SaveData(); }
// PUT: api/Customer/5 [HttpPut("{id}")] public void Put(int id, [FromBody] Customer value) { // replace the customer Customers[Customers.FindIndex( x => x.CustomerId == id)] = value; SaveData(); }
// DELETE: api/ApiWithActions/5 [HttpDelete("{id}")] public void Delete(int id) { var customer = (from x in Customers where x.CustomerId == id select x).FirstOrDefault(); if (customer != null) { Customers.Remove(customer); SaveData(); } }
private void LoadData() { customerDataFile = Environment.CurrentDirectory + @"\customers.json"; if (!System.IO.File.Exists(customerDataFile)) { Customers = GetAllCustomers(); SaveData(); } else { var json = System.IO.File.ReadAllText(customerDataFile); Customers = JsonConvert.DeserializeObject<List<Customer>>(json); } }
private void SaveData() { var json = JsonConvert.SerializeObject(Customers); System.IO.File.WriteAllText(customerDataFile, json); } }}CustomerService.cs:
xxxxxxxxxx using Newtonsoft.Json;using System;using System.Collections.Generic;using System.Linq;using System.Net.Http;using System.Text;using System.Threading.Tasks;
namespace BlazorWorkshop.Data{ public class CustomerService { /// TODO: Change this to use your app's port number //static string baseURL = "https://localhost:44315/";
public static async Task<List<Customer>> GetAllCustomers() { try { using (var http = new HttpClient()) { var uri = new Uri(baseURL + "api/customer"); string json = await http.GetStringAsync(uri); var customers = JsonConvert.DeserializeObject<List<Customer>>(json); return customers; } } catch (Exception ex) { return new List<Customer>(); } }
public static async Task<Customer> GetCustomer(int CustomerId) { try { using (var http = new HttpClient()) { var uri = new Uri(baseURL + "api/customer/" + CustomerId.ToString()); string json = await http.GetStringAsync(uri); var customer = JsonConvert.DeserializeObject<Customer>(json); return customer; } } catch (Exception ex) { return new Customer(); } }
public static async Task AddCustomer(Customer Customer) { using (var http = new HttpClient()) { var uri = new Uri(baseURL + "api/customer"); string json = JsonConvert.SerializeObject(Customer); var content = new StringContent(json, Encoding.UTF8, "application/json"); await http.PostAsync(uri, content); } }
public static async Task UpdateCustomer(Customer Customer) { using (var http = new HttpClient()) { var uri = new Uri(baseURL + "api/customer/" + Customer.CustomerId.ToString()); string json = JsonConvert.SerializeObject(Customer); var content = new StringContent(json, Encoding.UTF8, "application/json"); var result = await http.PutAsync(uri, content); if (result.StatusCode != System.Net.HttpStatusCode.OK) { throw new Exception("Customer was not updated"); } } }
public static async Task DeleteCustomer(int CustomerId) { using (var http = new HttpClient()) { var uri = new Uri(baseURL + "api/customer/" + CustomerId.ToString()); var result = await http.DeleteAsync(uri); if (result.StatusCode != System.Net.HttpStatusCode.OK) { throw new Exception("Customer was not deleted"); } } } }}Next Step: Final Touches
The next thing we will do is fortify our code with some error handling (remember, unhandled exceptions make for unhappy customers) and a nice way to notify the user of what is happening. We'll also refactor a bit of the code to make sure the UI stays in sync with the SelectedCustomer. Most of these changes are in Index.razor.
First, let's replace this:
xxxxxxxxxx @if (SelectedCustomer != null){ <br /> <br /> <span style="color:green;">Customer Selected: @SelectedCustomer.Name</span>;}with this:
xxxxxxxxxx <span style="color:@MessageColor;">@DisplayMessage</span>which means we need a couple new variables:
xxxxxxxxxx string DisplayMessage = "";string MessageColor = "green";Let's add a little error handling to the code that gets our initial data set:
xxxxxxxxxx protected override async Task OnInitializedAsync() { try { Customers = await CustomerService.GetAllCustomers(); } catch (Exception ex) { MessageColor = "red"; DisplayMessage = "Could not get customer data"; } }Now, let's remove the try/catch blocks from the code in CustomerService.cs:
xxxxxxxxxx using Newtonsoft.Json;using System;using System.Collections.Generic;using System.Linq;using System.Net.Http;using System.Text;using System.Threading.Tasks;
namespace BlazorWorkshop.Data{ public class CustomerService { /// TODO: Change this to use your app's port number static string baseURL = "https://localhost:44315/";
public static async Task<List<Customer>> GetAllCustomers() { using (var http = new HttpClient()) { var uri = new Uri(baseURL + "qapi/customer"); string json = await http.GetStringAsync(uri); var customers = JsonConvert.DeserializeObject<List<Customer>>(json); return customers; } }
public static async Task<Customer> GetCustomer(int CustomerId) { using (var http = new HttpClient()) { var uri = new Uri(baseURL + "api/customer/" + CustomerId.ToString()); string json = await http.GetStringAsync(uri); var customer = JsonConvert.DeserializeObject<Customer>(json); return customer; } }
public static async Task AddCustomer(Customer Customer) { using (var http = new HttpClient()) { var uri = new Uri(baseURL + "api/customer"); string json = JsonConvert.SerializeObject(Customer); var content = new StringContent(json, Encoding.UTF8, "application/json"); await http.PostAsync(uri, content); } }
public static async Task UpdateCustomer(Customer Customer) { using (var http = new HttpClient()) { var uri = new Uri(baseURL + "api/customer/" + Customer.CustomerId.ToString()); string json = JsonConvert.SerializeObject(Customer); var content = new StringContent(json, Encoding.UTF8, "application/json"); var result = await http.PutAsync(uri, content); if (result.StatusCode != System.Net.HttpStatusCode.OK) { throw new Exception("Customer was not updated"); } } }
public static async Task DeleteCustomer(int CustomerId) { using (var http = new HttpClient()) { var uri = new Uri(baseURL + "api/customer/" + CustomerId.ToString()); var result = await http.DeleteAsync(uri); if (result.StatusCode != System.Net.HttpStatusCode.OK) { throw new Exception("Customer was not deleted"); } } } }}You can test it by munging the URL to the API in the GetAllCustomers() method.
Next, let's add some error handling to the Update code:
xxxxxxxxxx async Task CustomerUpdating(Customer Customer) { try { await CustomerService.UpdateCustomer(Customer); Customers = await CustomerService.GetAllCustomers(); MessageColor = "green"; DisplayMessage = "Customer updated"; } catch (Exception ex) { MessageColor = "red"; DisplayMessage = "Could not update customer"; } }This time we not only display an error message in red if something goes wrong, but we display a message in green if everything goes right.
Changes to the code for Delete, Reset, and Add are similar:
xxxxxxxxxx async Task CustomerDeleting(int CustomerId) { try { await CustomerService.DeleteCustomer(CustomerId); Customers = await CustomerService.GetAllCustomers(); MessageColor = "green"; DisplayMessage = "Customer deleted"; } catch (Exception ex) { MessageColor = "red"; DisplayMessage = "Could not delete customer"; } }
async Task CustomerResetting(int CustomerId) { try { var originalCustomer = await CustomerService.GetCustomer(CustomerId); if (originalCustomer != null) { // replace the customer and reset the SelectedCustomer Customers[Customers.FindIndex( x => x.CustomerId == CustomerId)] = originalCustomer; SelectedCustomer = originalCustomer; MessageColor = "green"; DisplayMessage = "Customer restored";
} else { MessageColor = "red"; DisplayMessage = "Could not load existing customer"; } } catch (Exception ex) { MessageColor = "red"; DisplayMessage = "Could not reset customer"; } }
async Task CustomerAdding(Customer Customer) { try { var highest = Customers.OrderByDescending(i => i.CustomerId).Take(1).First(); Customer.CustomerId = highest.CustomerId + 1; await CustomerService.AddCustomer(Customer); SelectedCustomer = Customer; Customers = await CustomerService.GetAllCustomers(); MessageColor = "green"; DisplayMessage = "Customer added"; } catch (Exception ex) { MessageColor = "red"; DisplayMessage = "Could not add customer"; } }That's all good. Now we can rest assured that no API based problems will take us down.
Now, let's fix some behavioral problems. What happens when you Add a new customer? It goes to the bottom of the list. It would be good to select it once added. In order to do that, we have to modify the component starting with the select element.
Modify the select element in TestComponent.razor as follows:
xxxxxxxxxx <select ="CustomerSelected" size="4" style="width:100%"> (var customer in ) { if (SelectedCustomer != null && customer.CustomerId == SelectedCustomer.CustomerId) { <option selected value="@customer.CustomerId.ToString()">.Name</option> } else { <option value="@customer.CustomerId.ToString()">.Name</option> } } </select>This ensures that any time we're displaying customers, the SelectedCustomer is always selected in the list.
Let's modify the code that handles deletes (in Index.razor) to select the first customer after deleting.
xxxxxxxxxx async Task CustomerDeleting(int CustomerId) { try { await CustomerService.DeleteCustomer(CustomerId); Customers = await CustomerService.GetAllCustomers(); if (Customers.Count > 0) { SelectedCustomer = Customers.First(); } MessageColor = "green"; DisplayMessage = "Customer deleted"; } catch (Exception ex) { MessageColor = "red"; DisplayMessage = "Could not delete customer"; } } Now when you delete, the SelectedCustomer isn't still set to the one we just deleted!
Issue: InputText doesn't support oninput
This is a problem with an easy workaround. The problem is that since we changed over to use the validation-aware InputText control, we don't have the ability to update on every keystroke. Fortunately there is a workaround that only takes 2 lines of code.
Right-click on the Pages folder and add a new Razor Component named InstantInput.razor.
Replace the contents with these two lines:
xxxxxxxxxx @inherits Microsoft.AspNetCore.Components.Forms.InputText<input @attributes="@AdditionalAttributes" class="@CssClass" @bind="@CurrentValueAsString" @bind:event="oninput" />Now change your InputText elements to InstantInput elements and boom! Updates are instant on each keystroke.
xxxxxxxxxx @if (SelectedCustomer != null){ <div style="background-color:lightgray;padding:1vw;"> <EditForm Model="@SelectedCustomer" OnValidSubmit="@UpdateButtonClicked"> <DataAnnotationsValidator /> <ValidationSummary />
Name: <InstantInput id="name" @bind-Value="@SelectedCustomer.Name" /> <br /> <br />
Email: <InstantInput id="email" @bind-Value="@SelectedCustomer.Email" /> <br /> <br />
<button type="submit">Save</button> <button type="button" @onclick="ResetButtonClicked">Reset</button> <button type="button" @onclick="DeleteButtonClicked">Delete</button> </EditForm> </div>}That's it for Part 1. We have covered the fundamentals of components and how Blazor binding works, and we've learned a few cool tricks in the process.
Let's now move on to Part 2, where we'll create a more sophisticated app with EF Core and more complex components.